
How to get data from MySQL and push it REST API using C#
If you are a .NET developer and trying to get your data from the MYSQL database and push it in REST API using C# then this guide is perfect for you. This guide will cover the step-by-step process of creating sample data in MYSQL and fetching the data from the database. The data collected is then put into REST API also known as REST PUT using C#.
Fetch Data from MySQL:
Once you have created your REST service in the .NET project and now you need to introduce a database. There are several ways of doing so but we will just switch to the simpler ones for now. The IDE we are going to use for this tutorial is Visual Studio but there are a bunch of other tools as well like entity framework or hibernate etc.
First of all, we are going to see a simple database of employees having a sample table with their names and emails. After successfully creating the sample database then we will write some code to access that data.
In MySQL, you can simply create a database with the following code:
CREATE DATABASE [IF NOT EXISTS] database_name

[CHARACTER SET charset_name]

[COLLATE collation_name]
Here we are just specifying the name of the database after the keyword CREATE DATABASE but the name should be unique within an instance of the MySQL server. The IF NOT EXIST option act as a condition to create the database if it does not exist before. The next statement(s) here are just stating the collation and the charset but if this step is skipped then the default ones are selected by MySQL.
Now we are going to create the table in our database, the following piece of code will surely help you in doing so.
CREATE TABLE employee_data (

            EMPLOYEE_ID int ,

            FIRST_NAME varchar(255),

            LAST_NAME  varchar(255),

            Email varchar(255)

);
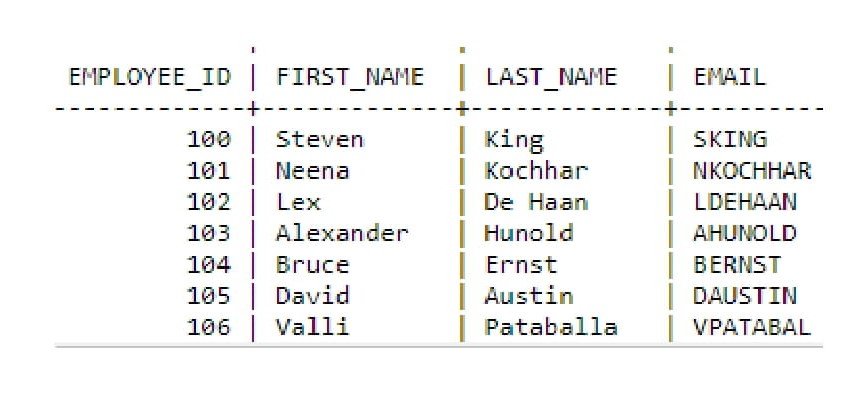
Now you can fill the table with your entries, so after inserting entries our table would look a bit like this:
Accessing the Data from MySQL:
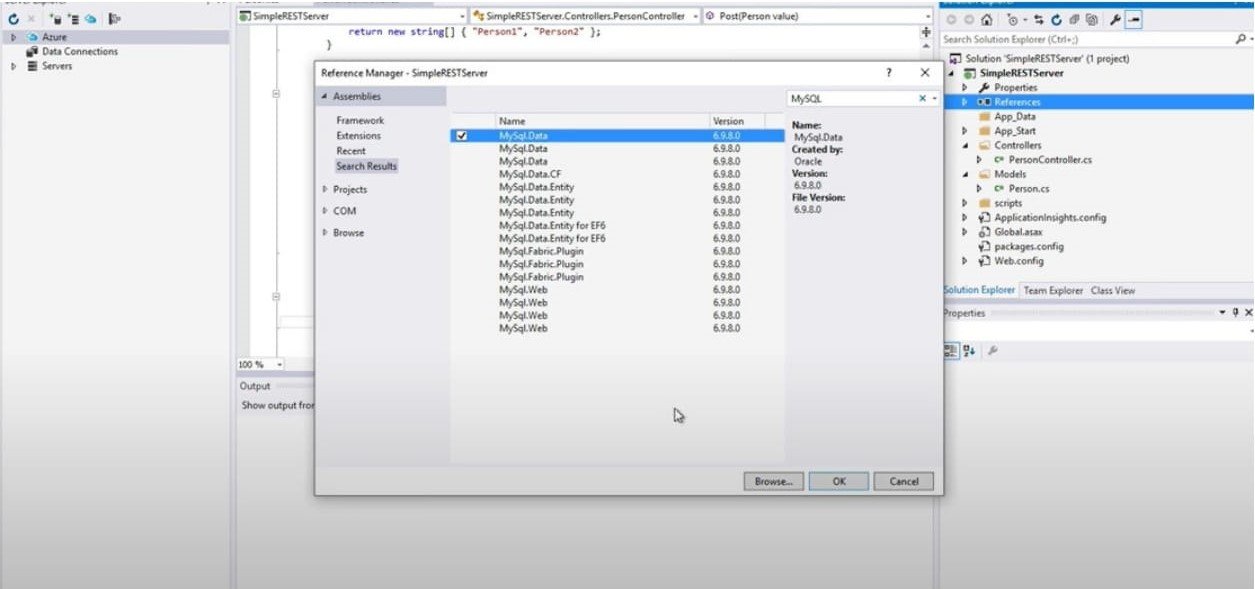
First of all, just add a reference to the connector information so if you just need to select MySQL in for the reference. Just make sure that MySQL is installed and now select the “MySQLData” like the screenshot given below:
Now we are going to store the model or object somewhere that we have created, for this purpose we are just going to create a persistence class. Just add a new folder named “app code” and a helper class in it with the name “Person Persistence”. Now follow the steps mentioned below:
• Include MySQL in the person persistence class
• Create a private data member by bringing in the MySQLClient and a connection that this whole class would use.
• Create a constructor and add your connection to the database, so we don’t have to mess up with the connection frequently and an instance would surely serve the purpose.
• For the connection, just set up a connection string and set an IP equal to it. In our case, it is localhost so it resolves to a server- with 127.0.0.1 and the user ID but if there would be a remote server the IP would be completely different. The account you have set up on the database is called developer user. Also, don’t forget to provide privileges to it.
• Now we will write a try-catch block, here we will handle a particular MySQL exception. In the try block, we will set our private data member to a new connection and will set the connection string on that class as my new connection string then just an open statement. In the catch block, there would be MySQLClient.MySQLException
namespace SimpleRESTServer.App_code
{
   public class PersonPersistence
   {
      private MySql.Data.MySqlClient.MySqlConnection conn;
      public PersonPersistence()
      {
         string myConnectionString;
         myConnectionString = "server-127.0.0.1; uid = developeruser; pwd=developer; database= employeedb";
         try
         {
            conn = new MySql.Data.MySqlClient.MySqlConnection();
            conn.ConnectionString = myConnectionString;
            conn.Open();
         }
         catch(MySql.Data.MySqlClient.MySqlException ex)
         {
         }
      }
   }
}
• You can also write some data to your database as well, for this purpose, we will have a function that inserts the data into your database.
public long savePerson(Person personToSave)
{
   String sqlString = "Insert into tblPersonnel (Employee_ID, FirstName, LastName, Email) VALUES('" + personToSave.Employee_ID + "','" + personToSave.FirstName + "', '" + personToSave.LastName + "' ,'" + personToSave.Email +"') ";
   MySql.Data.MySqlClient.MySqlCommand cmd = new MySql.Data.MySqlClient.MySqlCommand(sqlString,cmd);
   cmd.ExecuteNonQuery();
   long id = cmd.LastInsertedID;
   return id;
}
• Don’t forget to include the person class while doing it and we will have an ID to our object as well that would be returned when this object is saved.
• Now for the fetching of data, you would have your controller class in your project. In the POST, create a new person persistence class object and an ID variable of long data type. Now set the ID equal to the saveperson function that we just did earlier, it will surely return an ID to it. Now what will happen is that the data object would be sent to the server in JSON format and returns the ID from the database.
public void POST([FromBody]Person value)
{
   PersonPersistence pp = new PersonPersistence();
   long id;
   id = pp.savePerson(value);
}
• Also, when a POST happens, we are supposed to provide some sort of message to the client that a resource was created. To do that we are going to make amendments in our controller class and a response would be sent back to the client.
• Till now POST function is returning a void but we want it to return an HTTP response message. So, we will create an HTTP response message that would be sent back to the client.
• For the response, we will call the request object and it would be an HTTP status code and that status code we want is created. Now a header would be created that would point to the location of the resource, so set a new URI equal to it by request. Also, add a format and return the HTTP as well in the following way:
public HTTPResponseMessage POST([FromBody]Person value)
{
   PersonPersistence pp = new PersonPersistence();
   long id;
   id = pp.savePerson(value);
   HTTPResponseMessage response = Request.CreateResponse(HTTPStatusCode.Created);
   response.Header.Location = new Uri(Request.RequestUri,String.Format("person/{0}",id) );
   return response;
}
Conclusion:
Hence, we have achieved our goal of fetching the data from MySQL and pushing it into the REST API using C#. If you have any questions or queries just let us know in the comments below.